First Dynamic Query and Then Static Again
Purpose: use a dynamic file path for a Ability Query or Power BI data source, taken from a cell in the current workbook.

Links to topics on this page
- Scenario – why use dynamic file paths in Excel Power Query?
- Overview of steps to create dynamic Power Query data source
- Name cells and create named ranges in Excel
- Create Ability Query objects to get dynamic file source
- Manual selection to edit the source file path for a power query data connection
- More help with Power Query
Scenario:
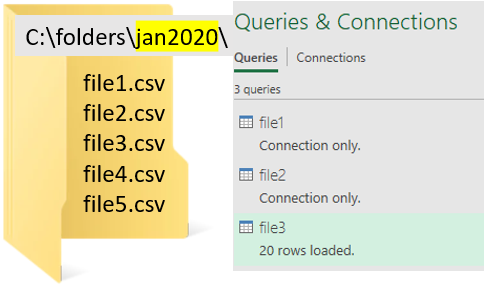
- Nosotros accept a batch of data files in a folder. Each calendar month, nosotros create a new month's folder, changing the source file path.
- An Excel workbook has separate Power Query data connections to each file.
- We enter the file path and file names into another worksheet in the workbook, creating dynamic file paths for the Power Query connections.
This folio shows how to connect to a csv file. Encounter our related post for linking to an Excel workbook in Power Query.
Overview of steps
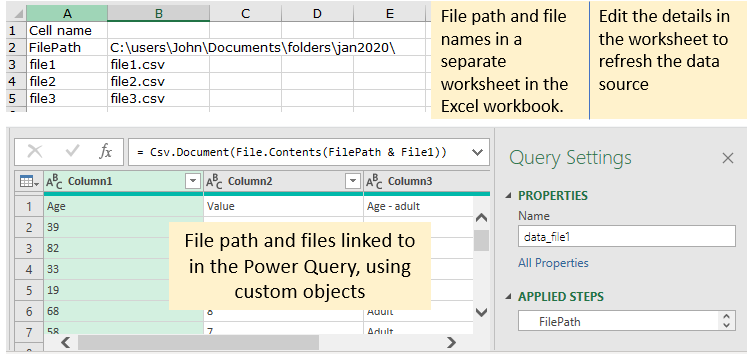
- Enter file path and file names into cells in a separate worksheet in the Excel workbook;
- Name the cells (click in the prison cell, and add a cell label into the name box);
- Create custom objects at the start of the Ability Query which define the file paths using the named cell references, using the Avant-garde Editor;
- Update the file path and file name details in the named cells to refresh the Power Query information source.
Name cells and create named ranges in Excel
To proper name a prison cell or range of cells:

- Go to the worksheet where you are going to relieve the custom file path and file name(s).
- Enter your file path into a jail cell, repeat for boosted file paths.
- Enter your file name into a cell, repeat for boosted file names.
- Click in each cell, then click in the 'Name box' (acme left box above the worksheet filigree).
- Enter the proper name you want to refer to the jail cell by, and so press Enter.
- Your name reference replaces the default jail cell reference.
- Note, your cursor will render to the highlighted cell.
- To create a named range of cells, select a range of cells, and and then name the range (not applicative to this method for creating dynamic file paths in Power Query).
Go to a named cell or range in Excel
To go straight to any named cell or range in an Excel workbook, click in the 'Name box', enter the proper name, and press Enter. The target worksheet is displayed and the named cell or range is highlighted.
↥ Back to overview steps
Create Power Query objects to get file paths from cells in the current workbook
Notation that Power Query doesn't provide a born way to get the path for the current workbook, and so another method is required. So, we create custom Power Query objects to link to dynamic file paths and file names.
- Get-go, enter your file path and file name details into a worksheet in your Excel workbook, as described above.
- Open a blank query, open the Avant-garde Editor window, and
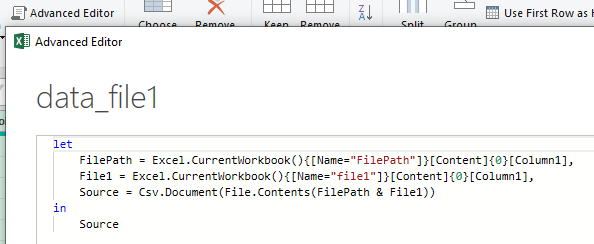
- Enter the three lines of code shown below, nether the default 'let' section:

The three lines of lawmaking explained:
Power Query: create the object to define the FILE PATH
FilePath = Excel.CurrentWorkbook(){[Name="FilePath"]}[Content]{0}[Column1],
- In our case to a higher place:
-
FilePath=creates an object named 'FilePath'; -
Name="FilePath"is referring to the prison cell in the worksheet that we have named 'FilePath'.
-
Power Query: create the object to define the FILE NAME
File1 = Excel.CurrentWorkbook(){[Name="File1″]}[Content]{0}[Column1],
- In the example above:
- 'File1' is the name of our custom Power Query object, and is the named cell in the worksheet containing the file path and file proper noun
- Excel.CurrentWorkbook() is the Excel function which points to contents inside the workbook.
Ability Query: define the DATA SOURCE equally a combination of the file path and file name
Source = Csv.Document(File.Contents(FilePath & File1))
- In our example, we're importing data from a csv file, so nosotros use the Csv.Document() part, meet more details from Microsoft help here.
- In the File.Contents() function we add our custom 'FilePath' and 'File1' objects created above.
Nosotros tin can now prepare our Power Query data manipulation steps every bit usual.
When the source information changes, nosotros tin can update the file path and file name details in the worksheet, and refresh the Ability Query.
↥ Dorsum to overview steps
Manual selection to edit the source file path for a ability query data connection
Just in instance you don't fancy using dynamic paths 🙂 it's pretty easy to manually amend the source reference in a Power Query.
In the Power Query window, click on the settings wheel adjacent to the 'Source' step in the Applied Steps pane. Yous can edit the file path directly, or click on the 'Browse' button to navigate to the file.
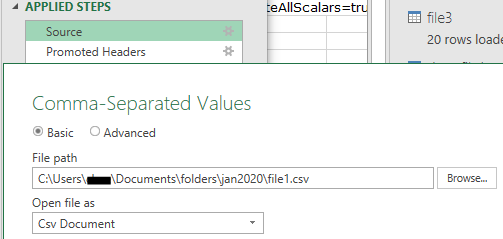
Alternatively, if you click on the actual step name 'Source' (not the settings wheel), you can edit the file path from the step editor box at the top of the window.

- Get started with Power Query – connect to data and add an Index column
- Power Query dynamic Excel worksheet proper name
- Power Query – concatenate text and numeric information
- Power Query IF ELSE and IF AND statements
Source: https://excelquick.com/excel-power-query/power-query-dynamic-file-path/
0 Response to "First Dynamic Query and Then Static Again"
Post a Comment